


april 10, 2016
SSH with Dropbear and your Karotz
In this post I'll share my Dropbear SSH adventures with you. First of all, I'm not a Linux expert. Also, I'm not an SSH expert either. I just wanted to know why the Dropbear binary included with OpenKarotz didn't work as I expected.
Dropbear is an SSH server. With SSH, you can remote login to your Karotz and get a remote shell using a secure (encrypted) protocol. You can login with a username/password but also with a (public and private) key-pair. The second method is preferred.
If you want to try things out, make sure you have an SSH client (I use Putty, because I use Windows).
Because several experiments with Dropbear didn't bring me any luck, I started reading on the web about the problems other people had. I noticed that older versions of Dropbear don't like accounts without a password. The user-accounts on your Karotz are stored in the password file /karotz/etc/passwd and most of them don't have a password.
Normally, a password file is stored in /etc/passwd. On Karotz, etc is a symbolic link to /usr/etc. And there, passwd is a symbolic link to /karotz/etc/passwd.
Note that /karotz is read-only, so /karotz/etc/passwd is also read-only. Because of this, we cannot change the password file to add a user or assign a password to an existing user very easily. We could copy the passwd file from /karotz/etc to another location and change the symbolic link. I tried that and that worked. But for now, we'll leave it this way.
If we have to deal with user-accounts without a password, we'll need to find a newer version of Dropbear supporting this. I looked for a pre-compiled Dropbear binary on the web. Luckily, I found one on http://landley.net/aboriginal/. Look in the menu under "Download" and click on "Prebuilt Binaries - Older". The structure of the downloads has changed in the newer versions, but after clicking some versions in the past if found a directory called "extras" with Dropbear binaries. The newest I found where located in 1.4.3/extras. Karotz will run "dropbearmulti-armv4tl" so download it.
If the file isn't there anymore, you can download my (zipped) copy of it.
Use WinSCP to FTP into your Karotz. Navigate to usr/karotz/ and create a new directory, name it "dropbear". Upload the new dropbear binary to this directory (by drag and drop in WinSCP). Start a Telnet session (using the Telnet client in Windows) and navigate to /usr/karotz/dropbear. Rename the file and set the right permissions:
chmod 755 dropbear
Now lets see what version we have and what the options in this version are:
Note the dot and slash at the beginning of the line. If you don't use these, you'll get the "old" dropbear located in /bin of your Karotz. So don't forget to enter the command in the current directory with dot and slash.
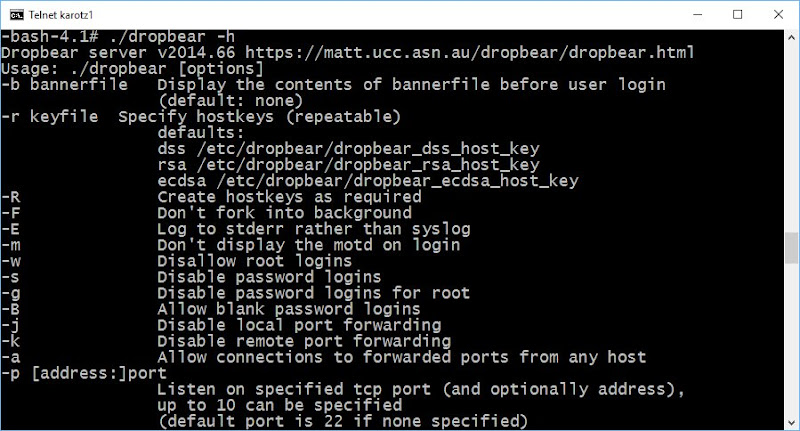
Yes, we have a newer version (2014.66) and it supports accounts without a password (option -B: Allow blank password logins).
Lets try to run the new Dropbear. For Dropbear to run, it needs server keys. We can create these keys with the dropbear binary (that's why it is called dropbearmulti, because the binary consists of multiple programs). Dropbear needs to know what command we want to execute, and we can do this by creating symbolic links. Lets create a symbolic link called "dropbearkey" for creating server keys.
Dropbear expects its keys in /etc/dropbear/. As mentioned before, /etc points to /usr/etc. So create a new directory under /usr/etc to hold the keys.
And create three keys using the new symlink we created:
./dropbearkey -t dss -f /usr/etc/dropbear/dropbear_dss_host_key
./dropbearkey -t ecdsa -f /usr/etc/dropbear/dropbear_ecdsa_host_key
Now lets start Dropbear. We don't want to run it in the background right now, so enter this command:
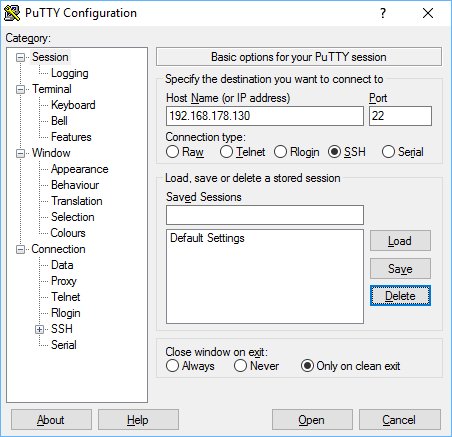
The server is now running in the foreground, it is logging its errors to the Telnet console and accepts blank passwords. Now start Putty, and enter the IP address of your Karotz. Also make sure you choose connection type SSH and port 22.
Try to connect. The first time, Putty warns you that is has not connected to this server before.
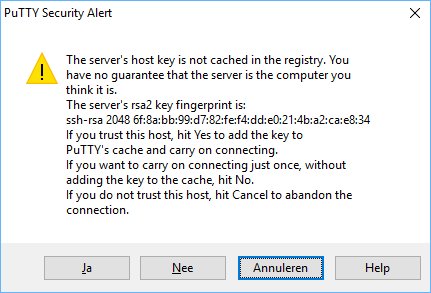
You can press Yes to add the server to your registry so Putty will remember it. After this, you'll get a login prompt asking for a username. Enter "karotz" as username. Then it will ask you for a password.
Wait a minute, a password? Lets take a look at our Telnet window.
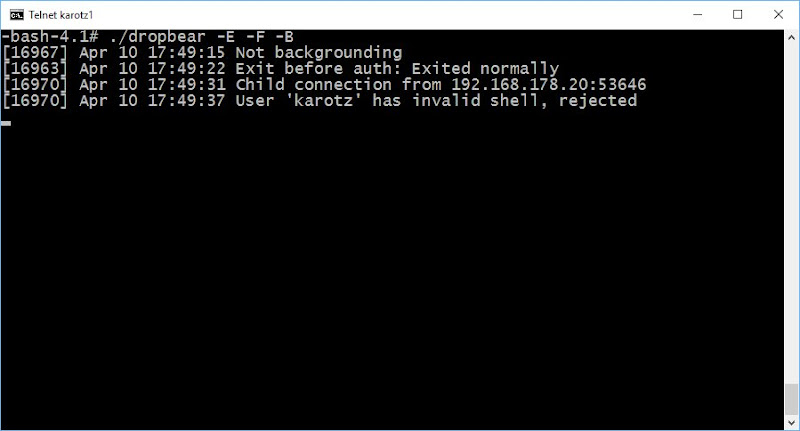
Dropbear is complaining about the shell of the Karotz user. In the passwd file, the default shell for every user is configured. For user Karotz, this is /bin/bash. Valid shells should be enumerated in the file /etc/shells. Quit Dropbear with CTRL+C, and add the bash shell to /etc/shells with this command:
Start Dropbear again.
Start Putty again and repeat the login procedure. Yes, we are in.
Now we are in, we want to create a public and private keypair so we can disable the password login. We will create the keys with PuttyGen.exe from your Putty folder. Start the program. Make sure "SSH-2 RSA" is selected and the number of bits is set to 2048. Press "Generate" and move your mouse over the blank area until the keys are generated. Change the key-comment as you like.
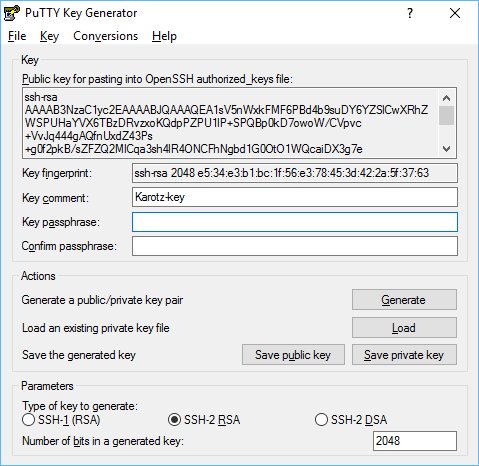
Save the private key (press the "Save private key" button) to your HD and don't share this with anybody (don't even sent it to someone using email). Copy the public key (the part under "Public key for pasting...") to your clipboard.
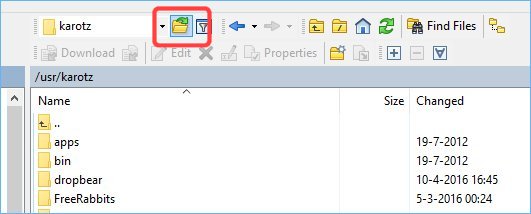
Now go back to WinSCP and navigate to /usr/karotz. Create a new directory and call it ".ssh" (right mouse click, choose "new", "directory" and enter ".ssh". Don't forget the dot, it will make your directory hidden). After the new directory is created, you won't see it. Use the menu of WinSCP and choose "Remote", "Goto", "Open Directory/Bookmark". Enter ".ssh". You can also use the button next to the field displaying the current directory name (as show below).
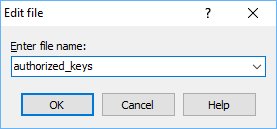
After you have changed to .ssh you will see an empty directory. Create a new file (right mouse click, "new", "File"). Enter the name "authorized_keys".
It depends on the editor you have configured in WinSCP what happens now. In mine, Notepad++ opens the new file. If this doesn't happen, open the new file from WinSCP. Copy the data from the clipboard (one line starting with "ssh-rsa"). Save the file.
Lets make sure the file is saved with Unix/Linux line-endings.
And lets make sure we have the right permissions for our keyfile and its parent directory:
chmod 600 /usr/karotz/.ssh/authorized_keys
Start Dropbear again, but this time with the following options:
The last option will tell Dropbear not to accept password logins.
Start Putty. Enter the IP address of your Karotz. Before clicking on "Open", goto "Connection", "SSH", "Auth".
Use the "Browse" button right to "Private key file for authentication" and choose your saved private key.
Goto "Connection", "Data" and enter "karotz" in the field "Auto-login username".
Select "Session", enter "Karotz-SSH" in the field under "Saved Sessions" and press the "Save"-Button.
Your session is now saved. Next time, you can select it and load it using the "Load" button.
Try to connect using the "Open" button now. If all is well, you won't be asked to enter a username or password and Putty is using your key to login.
If you see error messages complaining about /var/log/lastlog and /var/log/wtmp, create these files using commands:
touch /var/log/wtmp
To let Dropbear run in the background, enter command
Error-messages are now logged to the syslog and Dropbear is running in the background.
I hope you enjoyed this SSH tutorial.